


The threat of an attack on a city by terrorists or a foreign power using nuclear, biological or chemical weapons is ever present. The best way to ensure the safety of yourself and your family is to prepare for such a scenario by building an underground bomb shelter or bunker. In this article, we will discuss the different types of underground bomb shelters and bunker DIY plans.
Digging a hole and burying a shipping container: One popular method for building a DIY bunker is to dig a hole and bury a shipping container in it. This can be done using heavy equipment or by hand. Once the container is buried, it can be reinforced with concrete or steel.
Using a pre-fabricated kit: There are a number of companies that sell pre-fabricated bunker kits. These kits can be assembled on-site and can range in size from a small, single-room shelter to a large, multi-room bunker.
Building from scratch: For those with the necessary skills and resources, building a bunker from scratch is an option. This involves excavating the site, pouring a foundation, and building the structure using concrete or steel.
In conclusion, the threat of a nuclear, biological or chemical attack is a reality that cannot be ignored. By building an underground bomb shelter or bunker, you can ensure the safety of yourself and your family in the event of such an attack. There are a variety of options available, from pre-fabricated kits to DIY plans. It is important to research and carefully consider the different options before deciding on the best one for your needs.
"The federal government recommends that Americans take steps to prepare for all types of emergencies, including nuclear, biological, and chemical attacks. Building an underground bomb shelter or bunker can be an effective way to protect yourself and your family in the event of such an attack."
Source: Ready.gov, the official website of the U.S. Department of Homeland Security's Ready Campaign.
A concrete septic tank makes a sturdy base for a basic underground shelter and is cheap and comparatively quick to install. Buy a Septic Tank Bunker on Amazon.
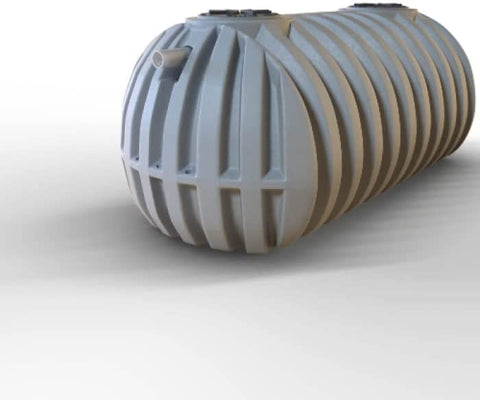
Around 20% of all the homes in the US already have a septic tank installed, but that doesn’t help. If your septic tank is already trapping and filtering your toilet waste, you can’t go and live in it, but you could install another one as your purpose-built backyard bunker.
The most popular 1,500-gallon septic tank measures around six feet wide by 10 feet wide, giving you approximately 60 square feet of floor space. As you need around 10 square feet per person, this would give you a bunker big enough to house up to six people.
Read:
The Doomsday Preppers Ultimate Guide: From Maps to Gas Masks
To make an underground bunker using a concrete septic tank, you can either order a pre-cast tank from a reputable manufacturer or build your own.
The average cost of a 1500-gallon pre-cast concrete septic tank is approximately $1,590, which is a lot cheaper than the average underground bunker. To give you a clearer idea, this 8’ x 12’ mini bunker carries a price tag of $45,500!
While you’ll struggle to transform a septic tank into luxury underground accommodation, you can make it safe and survivable.
To make the bunker safe, you need to add insulation and ventilation, but both these steps can be completed relatively easily using polystyrene insulation panels and 12v computer fans.
You can also install a basic plumbing system and lighting to make your underground experience more comfortable.
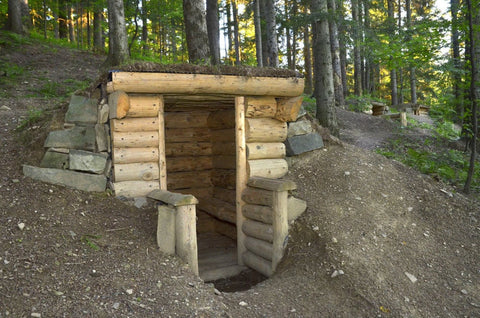
It’s not only fruit and vegetables that can prosper in a root cellar – humans can also survive down there for months at a time. Our previous article on root cellars gives lots of useful planning advice and explores the pros and cons of various designs.
You can also find some useful root cellar plans here.
With a little imagination, you can convert a basic root cellar into an underground or backyard bunker that offers a safe retreat when disaster strikes.
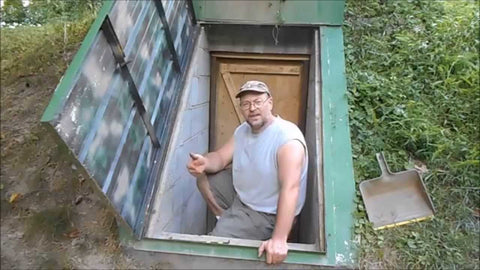
This plan for an underground steel bomb shelter dates back to 1962 and was created by the US Department of Defense. In its entirety, the document contains eight different types of shelter, each of which was designed “for use by families who do not have access to community shelters.”
This shelter provides “fallout protection” against any radiation following a nuclear attack and is fire resistant. It’s designed to accommodate three people, but at a stretch, could house a family of four for at least a couple of days.
This design uses a pre-fabricated steel culvert, a little like those manufactured by Atlas Survival Shelters. Unfortunately, prices have changed a bit since 1962 and what would have once cost “$150 or less” will now cost around 10 times more.
You can create your own steel bunker using a 48” culvert pipe, but you’ll need a high-quality product if it’s to withstand the weight of the earth you put on top to conceal the bunker.
Build this Shelter:
Building a below-ground corrugated steel culvert shelter is a great way to provide affordable and reliable protection for you and your family during an emergency. This type of shelter is durable, easy to construct, and can be customized to meet your specific needs. In this blog post, we'll provide step-by-step instructions on how to build a below-ground corrugated steel culvert shelter and recommend some products to help you get started.
Step 1: Choose the Location and Size of Your Shelter
The first step in building a corrugated steel culvert shelter is to choose the location and size of your shelter. You'll want to select an area that is easily accessible and has good drainage. Determine the size of the shelter based on the number of people and items that you plan to store inside.
Step 2: Prepare the Site
Once you've chosen the location and size of your shelter, you'll need to prepare the site. Clear the area of any debris and level the ground. Mark the perimeter of the shelter using stakes and string.
Step 3: Excavate the Site
Using an excavator or other heavy machinery, begin excavating the site to the depth and width required for your shelter. Make sure to create a level and smooth base for the shelter.
Step 4: Install the Culvert
Next, install the corrugated steel culvert into the excavated hole. Make sure that the culvert is level and supported by a solid foundation. Use a backhoe or other equipment to position the culvert into place.
Step 5: Secure the Culvert
Once the culvert is in place, secure it with concrete. Fill the space around the culvert with concrete and smooth it out to create a level surface. Allow the concrete to cure for at least 24 hours.
Step 6: Install the Entryway
Now it's time to install the entryway to your shelter. Choose a sturdy steel door that is large enough for easy access. You'll also want to install a ventilation system to keep the air inside fresh and breathable.
Step 7: Add Finishing Touches
Finally, you can add finishing touches to your shelter such as lighting, shelving, and seating. Make sure to stock your shelter with plenty of food, water, and emergency supplies to ensure that you're prepared for any situation.
Product Recommendations:
Building a corrugated steel culvert shelter is a great way to ensure that you and your family are prepared for any emergency situation. With these step-by-step instructions and Amazon product recommendations, you'll have everything you need to build a durable and reliable shelter.
A concrete underground bunker offers excellent protection against radiation, fire, and explosive shockwaves. To be effective, you need the walls of your bunker to be between one and three feet thick, which is going to increase your costs significantly.
Your underground bunker also needs to be about 10 feet underground if it’s to offer protection against a nuclear attack, so it’s no small undertaking.
The best way to approach a project of this size is to keep your plan as simple as possible.
This is a good example of a basic plan for a concrete underground bunker. It’s similar to the pre-fabricated nuclear bomb shelters available online but should cost a lot less than $80,000 to construct.
I do not recommend building an underground shelter using wood as it is not a suitable material for underground construction. However, if you are determined to build an underground shelter with wood, I can provide some general guidelines and considerations for the construction process.
Materials Needed:
Step-by-Step Instructions:
Choose a location: Select a suitable location for your shelter that is away from any trees or other structures that could damage it in case of a collapse. Be sure to check with your local building department to obtain any necessary permits.
Dig the hole: Use a backhoe or shovel to dig a hole in the ground that is deep enough to accommodate the size of your shelter. The hole should be at least 8 feet deep to provide adequate protection.
Build the frame: Construct the frame of the shelter using pressure-treated lumber. The walls should be at least 8 feet high and the roof should be sloped to allow for water runoff. Install the ventilation system at this stage.
Install the insulation: Install insulation between the walls and ceiling to provide temperature regulation and soundproofing.
Install the waterproofing: Apply a waterproofing sealant to the exterior of the shelter to protect it from moisture and potential leaks.
Install the plywood: Install 3/4 inch plywood over the frame and seal the seams with caulking.
Install the door: Install a sturdy, waterproof door with a multi-point locking system. Consider using a steel door for added protection.
Finish the interior: Finish the interior of the shelter with insulation, drywall, and any desired amenities such as furniture, appliances, and storage units.
Test and secure the shelter: Before using the shelter, test all systems and ensure that they are functioning properly. The shelter should also be secured with appropriate locks, alarms, and security measures to prevent unauthorized access.
Product Recommendations:
Please note that this is just a general guideline for building a wooden underground shelter and it is important to consult with a professional engineer or contractor to ensure that the shelter is safe and meets all necessary codes and regulations.
Another offering from the Department of Defense, this one is made of brick and structural clay masonry units.
Ideally built as part of a new house, this underground bunker can accommodate up to six people and should, if built correctly, last up to 30 years.
Determine the Purpose and Location of the Shelter: The first step is to determine the intended purpose of the shelter and choose a suitable location. Consider factors such as soil stability, drainage, accessibility, and proximity to utilities and water sources.
Design the Layout and Size of the Shelter: The layout and size of the shelter will depend on its intended purpose and the available space. Consider factors such as the number of people who will be using the shelter, the amount of food and supplies that need to be stored, and the desired amenities such as bathroom facilities, living areas, and storage space.
Excavate the Site: Once the location and size of the shelter have been determined, the site can be excavated. Excavation can be done manually or with heavy machinery, depending on the size and complexity of the shelter.
Lay the Foundation: After excavation, the foundation can be laid using concrete and rebar. The foundation should be at least 8 inches thick and extend at least 4 inches above ground level to prevent water infiltration.
Build the Walls: The walls can be built using bricks and mortar. The walls should be at least 8 inches thick to provide adequate protection against potential threats. Reinforced steel bars can be used for extra strength.
Install a Steel Door and Ventilation System: The steel door should be installed into the brick walls using a sturdy frame and anchor bolts. The door should have a multi-point locking system and be designed to withstand high-pressure and impact. A ventilation system is also essential for air circulation and removal of toxic gases.
Install Electrical and Plumbing Systems: Electrical and plumbing systems can be installed inside the shelter to provide lighting, ventilation, heating, and water supply. It is important to ensure that these systems are properly designed and installed to avoid any potential hazards or failures.
Finish the Interior: Once the structural elements and systems have been installed, the interior can be finished with insulation, drywall, flooring, and any desired amenities such as furniture, appliances, and storage units.
Remember that building an underground bomb shelter requires careful planning, expertise, and resources. It is important to consult with a professional engineer or contractor to ensure that the shelter is safe and meets all necessary codes and regulations.
This unusual series of videos was created for British television and gives step-by-step insights into building your own stainless steel bunker.
From the stainless steel sheeting used for the sides to the reinforced roof supports, it shows you how you can construct something very similar to an underground shipping container but far safer to utilize as a survival bunker.


{"one"=>"Select 2 or 3 items to compare", "other"=>"{{ count }} of 3 items selected"}
or 0 interest-free payments of ((PARCELA))
or ((PARCELAS)) interest-free payments of ((PARCELA))